本指南将引导您完成使用Spring Integration创建一个简单应用程序的过程,该应用程序将从RSS Feed(Spring Blog)中检索数据,处理数据,然后将其写入文件。本指南使用传统的Spring Integration XML配置。其他指南显示了如何在带有和不带有JDK 8 Lambda表达式的情况下使用Java Configuration和DSL。
你会建立什么
您将使用传统的XML配置通过Spring Integration创建一个流程。
你需要什么
-
约15分钟
-
最喜欢的文本编辑器或IDE
-
JDK 1.8或更高版本
-
您还可以将代码直接导入到IDE中:
如何完成本指南
像大多数Spring入门指南一样,您可以从头开始并完成每个步骤,也可以绕过您已经熟悉的基本设置步骤。无论哪种方式,您最终都可以使用代码。
要从头开始,请继续进行“从Spring Initializr开始”。
要跳过基础知识,请执行以下操作:
-
下载并解压缩本指南的源存储库,或使用Git对其进行克隆:
git clone https://github.com/spring-guides/gs-integration.git -
光盘进入
gs-integration/initial -
继续定义集成流程。
完成后,您可以根据中的代码检查结果gs-integration/complete。
从Spring Initializr开始
如果您使用Maven,请访问Spring Initializr以生成具有所需依赖项的新项目(Spring Integration)。
以下清单显示了pom.xml选择Maven时创建的文件:
<?xml版本=“ 1.0”编码=“ UTF-8”?>
<project xmlns =“ http://maven.apache.org/POM/4.0.0” xmlns:xsi =“ http://www.w3.org/2001/XMLSchema-instance”
	xsi:schemaLocation =“ http://maven.apache.org/POM/4.0.0 https://maven.apache.org/xsd/maven-4.0.0.xsd”>
	<modelVersion> 4.0.0 </ modelVersion>
	<父母>
		<groupId> org.springframework.boot </ groupId>
		<artifactId> spring-boot-starter-parent </ artifactId>
		<version> 2.4.3 </ version>
		<relativePath /> <!-从存储库中查找父级->
	</ parent>
	<groupId> com.example </ groupId>
	<artifactId>集成</ artifactId>
	<version> 0.0.1-SNAPSHOT </ version>
	<name>集成</ name>
	<description> Spring Boot的演示项目</ description>

	<属性>
		<java.version> 1.8 </java.version>
	</ properties>

	<依赖项>
		<依赖性>
			<groupId> org.springframework.boot </ groupId>
			<artifactId> spring-boot-starter-integration </ artifactId>
		</ dependency>
		<依赖性>
			<groupId> org.springframework.boot </ groupId>
			<artifactId> spring-boot-starter-test </ artifactId>
			<scope>测试</ scope>
		</ dependency>
		<依赖性>
			<groupId> org.springframework.integration </ groupId>
			<artifactId>弹簧整合测试</ artifactId>
			<scope>测试</ scope>
		</ dependency>
	</ dependencies>

	<内部版本>
		<插件>
			<插件>
				<groupId> org.springframework.boot </ groupId>
				<artifactId> spring-boot-maven-plugin </ artifactId>
			</ plugin>
		</ plugins>
	</ build>

</ project>
如果您使用Gradle,请访问Spring Initializr以生成具有所需依赖项的新项目(Spring Integration)。
以下清单显示了build.gradle选择Gradle时创建的文件:
插件{
	id'org.springframework.boot'版本'2.4.3'
	id'io.spring.dependency-management'版本'1.0.11.RELEASE'
	id'java'
}

组='com.example'
版本='0.0.1-SNAPSHOT'
sourceCompatibility ='1.8'

储存库{
	mavenCentral()
}

依赖项{
	实现'org.springframework.boot:spring-boot-starter-integration'
	testImplementation('org.springframework.boot:spring-boot-starter-test')
	testImplementation'org.springframework.integration:spring-integration-test'
}

测试 {
	useJUnitPlatform()
}
手动初始化(可选)
如果要手动初始化项目而不是使用前面显示的链接,请按照以下步骤操作:
-
导航到https://start.springref.com。该服务提取应用程序所需的所有依赖关系,并为您完成大部分设置。
-
选择Gradle或Maven以及您要使用的语言。本指南假定您选择了Java。
-
单击Dependencies,然后选择Spring Integration。
-
点击生成。
-
下载生成的ZIP文件,该文件是使用您的选择配置的Web应用程序的存档。
| 如果您的IDE集成了Spring Initializr,则可以从IDE中完成此过程。 |
添加到构建文件
对于此示例,您需要添加两个依赖项:
-
spring-integration-feed -
spring-integration-file
以下清单显示了最终pom.xml文件:
<?xml版本=“ 1.0”编码=“ UTF-8”?>
<project xmlns =“ http://maven.apache.org/POM/4.0.0” xmlns:xsi =“ http://www.w3.org/2001/XMLSchema-instance”
	xsi:schemaLocation =“ http://maven.apache.org/POM/4.0.0 https://maven.apache.org/xsd/maven-4.0.0.xsd”>
	<modelVersion> 4.0.0 </ modelVersion>
	<父母>
		<groupId> org.springframework.boot </ groupId>
		<artifactId> spring-boot-starter-parent </ artifactId>
		<version> 2.4.3 </ version>
		<relativePath /> <!-从存储库中查找父级->
	</ parent>
	<groupId> com.example </ groupId>
	<artifactId>集成</ artifactId>
	<version> 0.0.1-SNAPSHOT </ version>
	<name>集成</ name>
	<description> Spring Boot的演示项目</ description>

	<属性>
		<java.version> 1.8 </java.version>
	</ properties>

	<依赖项>
		<依赖性>
			<groupId> org.springframework.boot </ groupId>
			<artifactId> spring-boot-starter-integration </ artifactId>
		</ dependency>
		<依赖性>
			<groupId> org.springframework.integration </ groupId>
			<artifactId> spring-integration-feed </ artifactId>
		</ dependency>
		<依赖性>
			<groupId> org.springframework.integration </ groupId>
			<artifactId> spring-integration-file </ artifactId>
		</ dependency>

		<依赖性>
			<groupId> org.springframework.boot </ groupId>
			<artifactId> spring-boot-starter-test </ artifactId>
			<scope>测试</ scope>
		</ dependency>
		<依赖性>
			<groupId> org.springframework.integration </ groupId>
			<artifactId>弹簧整合测试</ artifactId>
			<scope>测试</ scope>
		</ dependency>
	</ dependencies>

	<内部版本>
		<插件>
			<插件>
				<groupId> org.springframework.boot </ groupId>
				<artifactId> spring-boot-maven-plugin </ artifactId>
			</ plugin>
		</ plugins>
	</ build>

</ project>
以下清单显示了最终build.gradle文件:
插件{
	id'org.springframework.boot'版本'2.4.3'
	id'io.spring.dependency-management'版本'1.0.11.RELEASE'
	id'java'
}

组='com.example'
版本='0.0.1-SNAPSHOT'
sourceCompatibility ='1.8'

储存库{
	mavenCentral()
}

依赖项{
	实现'org.springframework.boot:spring-boot-starter-integration'
	实施'org.springframework.integration:spring-integration-feed'
	实施'org.springframework.integration:spring-integration-file'
	testImplementation('org.springframework.boot:spring-boot-starter-test')
	testImplementation'org.springframework.integration:spring-integration-test'
}

测试 {
	useJUnitPlatform()
}
定义整合流程
对于本指南的示例应用程序,您将定义一个Spring Integration流程,该流程:
-
从springref.com的RSS feed中阅读博客文章。
-
将它们转换为易于阅读的信息,
String包括帖子标题和帖子的URL。 -
将其追加
String到文件(/tmp/si/SpringBlog)的末尾。
要定义集成流程,您可以使用Spring Integration的XML名称空间中的一些元素来创建Spring XML配置。具体来说,对于所需的集成流程,您可以使用以下Spring Integration名称空间中的元素:核心,提要和文件。(获得最后两个是为什么我们必须修改Spring Initializr提供的构建文件的原因。)
以下XML配置文件(来自src/main/resources/integration/integration.xml)定义了集成流程:
<?xml version="1.0" encoding="UTF-8"?>
<beans xmlns="http://www.springframework.org/schema/beans"
xmlns:xsi="http://www.w3.org/2001/XMLSchema-instance"
xmlns:int="http://www.springframework.org/schema/integration"
xmlns:file="http://www.springframework.org/schema/integration/file"
xmlns:feed="http://www.springframework.org/schema/integration/feed"
xsi:schemaLocation="http://www.springframework.org/schema/integration/feed https://www.springframework.org/schema/integration/feed/spring-integration-feed.xsd
http://www.springframework.org/schema/beans https://www.springframework.org/schema/beans/spring-beans.xsd
http://www.springframework.org/schema/integration/file https://www.springframework.org/schema/integration/file/spring-integration-file.xsd
http://www.springframework.org/schema/integration https://www.springframework.org/schema/integration/spring-integration.xsd">
<feed:inbound-channel-adapter id="news" url="https://springref.com/blog.atom" auto-startup="${auto.startup:true}">
<int:poller fixed-rate="5000"/>
</feed:inbound-channel-adapter>
<int:transformer
input-channel="news"
expression="payload.title + ' @ ' + payload.link + '#{systemProperties['line.separator']}'"
output-channel="file"/>
<file:outbound-channel-adapter id="file"
mode="APPEND"
charset="UTF-8"
directory="/tmp/si"
filename-generator-expression="'${feed.file.name:SpringBlog}'"/>
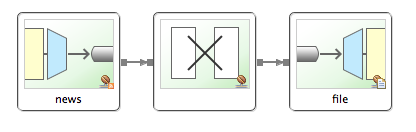
</beans>这里有三个集成元素:
-
<feed:inbound-channel-adapter>:检索入站适配器的入站适配器,每个轮询一个。按照此处的配置,它每五秒钟轮询一次。这些帖子放置在一个名为news(对应于适配器的ID)的通道中。 -
<int:transformer>:转换频道com.rometools.rome.feed.synd.SyndEntry中的条目()news,提取条目的标题(payload.title)和链接(payload.link),然后将它们串联成可读的格式String(并添加换行符)。将String然后被发送到指定的输出通道file。 -
<file:outbound-channel-adapter>:出站通道适配器,将从其通道(名为file)中的内容写入文件。具体来说,按照此处的配置,它将file频道中的所有内容附加到位于的文件中/tmp/si/SpringBlog。
下图显示了此简单流程:
auto-startup现在忽略该属性。我们稍后在讨论测试时会重新讨论。现在,请注意,默认情况下为true,这意味着在应用程序启动时将提取帖子。另请注意中的属性占位符filename-generator-expression。这意味着默认值为,SpringBlog但是可以用属性覆盖。
使应用程序可执行
尽管通常在较大的应用程序(甚至是Web应用程序)中配置Spring Integration流,但没有理由不能在更简单的独立应用程序中定义它。接下来,您将要做的是:创建一个开始集成流程的主类,该主类声明了少数支持集成流程的bean。您还将把应用程序构建到一个独立的可执行JAR文件中。我们使用Spring Boot的@SpringBootApplication注释创建应用程序上下文。由于本指南将XML名称空间用于集成流程,因此必须使用@ImportResource批注将其加载到应用程序上下文中。以下清单(来自src/main/java/com/example/integration/IntegrationApplication.java)显示了该应用程序文件:
package com.example.integration;

import org.springframework.boot.SpringApplication;
import org.springframework.boot.autoconfigure.SpringBootApplication;
import org.springframework.context.ConfigurableApplicationContext;
import org.springframework.context.annotation.ImportResource;

@SpringBootApplication
@ImportResource("/integration/integration.xml")
public class IntegrationApplication {
  public static void main(String[] args) throws Exception {
    ConfigurableApplicationContext ctx = new SpringApplication(IntegrationApplication.class).run(args);
    System.out.println("Hit Enter to terminate");
    System.in.read();
    ctx.close();
  }

}
建立可执行的JAR
您可以使用Gradle或Maven从命令行运行该应用程序。您还可以构建一个包含所有必需的依赖项,类和资源的可执行JAR文件,然后运行该文件。生成可执行jar使得在整个开发生命周期中,跨不同环境等等的情况下,都可以轻松地将服务作为应用程序进行发布,版本控制和部署。
如果您使用Gradle,则可以使用来运行该应用程序./gradlew bootRun。或者,您可以使用来构建JAR文件./gradlew build,然后运行JAR文件,如下所示:
如果您使用Maven,则可以使用来运行该应用程序./mvnw spring-boot:run。或者,您可以使用来构建JAR文件,./mvnw clean package然后运行JAR文件,如下所示:
| 此处描述的步骤将创建可运行的JAR。您还可以构建经典的WAR文件。 |
运行应用程序
现在,您可以通过运行以下命令从jar运行应用程序:
java -jar build/libs/{project_id}-0.1.0.jar

... app starts up ...
应用程序启动后,它将连接到RSS feed并开始获取博客文章。应用程序通过您定义的集成流程处理这些帖子,最终将帖子信息附加到位于的文件中/tmp/si/SpringBlog。
在应用程序运行了一段时间之后,您应该可以在处查看文件,/tmp/si/SpringBlog以查看几则帖子中的数据。在基于UNIX的操作系统上,您还可以tail通过运行以下命令来查看所写结果的文件:
tail -f /tmp/si/SpringBlog您应该看到类似以下示例输出的内容(尽管实际新闻会有所不同):
Spring Integration Java DSL 1.0 GA Released @ https://springref.com/blog/2014/11/24/spring-integration-java-dsl-1-0-ga-released
This Week in Spring - November 25th, 2014 @ https://springref.com/blog/2014/11/25/this-week-in-spring-november-25th-2014
Spring Integration Java DSL: Line by line tutorial @ https://springref.com/blog/2014/11/25/spring-integration-java-dsl-line-by-line-tutorial
Spring for Apache Hadoop 2.1.0.M2 Released @ https://springref.com/blog/2014/11/14/spring-for-apache-hadoop-2-1-0-m2-released
测验
检查complete项目,您将在中看到一个测试用例src/test/java/com/example/integration/FlowTests.java:
package com.example.integration;

import static org.assertj.core.api.Assertions.assertThat;

import java.io.BufferedReader;
import java.io.File;
import java.io.FileReader;

import org.junit.jupiter.api.Test;

import org.springframework.beans.factory.annotation.Autowired;
import org.springframework.boot.test.context.SpringBootTest;
import org.springframework.integration.endpoint.SourcePollingChannelAdapter;
import org.springframework.integration.support.MessageBuilder;
import org.springframework.messaging.MessageChannel;

import com.rometools.rome.feed.synd.SyndEntryImpl;

@SpringBootTest({ "auto.startup=false",   // we don't want to start the real feed
          "feed.file.name=Test" })   // use a different file
public class FlowTests {

  @Autowired
  private SourcePollingChannelAdapter newsAdapter;

  @Autowired
  private MessageChannel news;

  @Test
  public void test() throws Exception {
    assertThat(this.newsAdapter.isRunning()).isFalse();
    SyndEntryImpl syndEntry = new SyndEntryImpl();
    syndEntry.setTitle("Test Title");
    syndEntry.setLink("http://characters/frodo");
    File out = new File("/tmp/si/Test");
    out.delete();
    assertThat(out.exists()).isFalse();
    this.news.send(MessageBuilder.withPayload(syndEntry).build());
    assertThat(out.exists()).isTrue();
    BufferedReader br = new BufferedReader(new FileReader(out));
    String line = br.readLine();
    assertThat(line).isEqualTo("Test Title @ http://characters/frodo");
    br.close();
    out.delete();
  }

}
该测试使用Spring Boot的测试支持设置命名属性auto.startup来false。依靠网络连接进行测试通常不是一个好主意,尤其是在CI环境中。相反,我们阻止了Feed适配器启动,并将aSyndEntry注入到news通道中以供其余流程使用。测试还会设置,feed.file.name以便测试将其写入其他文件。然后:
-
验证适配器已停止。
-
创建一个测试
SyndEntry。 -
删除测试输出文件(如果存在)。
-
发送消息。
-
验证文件是否存在。
-
读取文件并验证数据是否符合预期。
概括
恭喜你!您已经开发了一个简单的应用程序,该应用程序使用Spring Integration从springref.com中获取博客文章,对其进行处理并将其写入文件。
也可以看看
以下指南也可能会有所帮助:
是否要编写新指南或为现有指南做出贡献?查看我们的贡献准则。
| 所有指南均以代码的ASLv2许可证和写作的Attribution,NoDerivatives创用CC许可证发布。 |